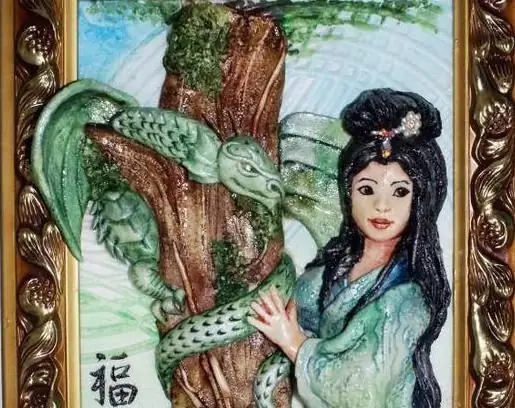
For the first time, salty dough was used by practical Germans. Poor families used it to make decorations for the Christmas tree. Salt was added so that voracious mice did not feast on crafts.

Making salty dough
For salty dough, combine equal proportions of salt and flour in a convenient bowl. Add 125 ml water and mix thoroughly until smooth. To make the material plastic, add 1 tablespoon of hand cream or vegetable oil. After kneading, place the dough in the cold for 2-3 hours.
In addition to the test, to create a picture you will need:
- a board for modeling;
- the basis for the picture from chipboard;
- knife;
- scissors;
- paints;
- brushes;
- acrylic paints.
Sequence of execution
Wrap the frame for the future painting with foil. With a pen, draw the outlines of the girl and the tree. Roll out the dough sausage with a rolling pin and place on the left side of the composition. Use a brush to moisten the surface and shape the texture of the bark. Blind a branch for the dragon, align the junction with the trunk with your fingers.
On a fine grater, grate a small amount of dough and lay on a branch in the form of foliage. Fix the parts after preliminary wetting of the surface.
The dragon should be sculpted from its tail. Form a tail, moisten abundantly with water and use scissors to make small cuts, thereby "applying" scales. After you wrap the tail around the trunk again, shape the torso and apply scales to it as described above.
For dragon wings, roll out a slab of dough and cut out a drop shape with a knife. Bend the top of the drop forward. Lay the wing, bending towards you, apply veins on top. From a small ball, blind the head, connect to the neck, apply the nostrils, eye sockets and mouth. Attach a mother-of-pearl bead instead of an eye. Sculpt the second wing in the same way, while gluing it, lift the tree trunk with a knife and push the wing under it.
Start modeling the girl from her torso. For clothing, you will need a silicone stamp or any textured surface that can leave an impression. Apply a print to the rolled dough and secure to the upper body. Lay the second layer of the rolled dough in the form of a dress, forming folds at the waist.
Roll your hand and with the help of nail scissors shape your fingers, lay it to the tail of the dragon. When attaching the head, use a toothpick so that the head does not fall off when drying. Moisten the part where the face will be and define the eye sockets, nose and lips. Sculpt the nose from a tiny droplet of dough and smooth it thoroughly.
Pass the dough through a garlic crushing tool. Style your hair from the resulting sausages. Decorate your hair with beads.
Dry the painting naturally for 7-8 days. Use watercolors, acrylics or gouache for painting. After drying, cover the painting with varnish.


