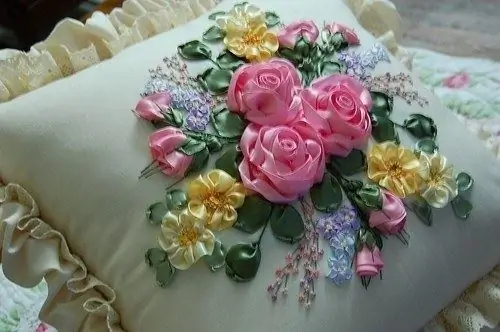
Ribbon embroidery is not too complicated, but a very beautiful kind of needlework. Once you start embroidering small motifs, you will soon be able to master more advanced techniques. Cushions, baptismal dresses, diary and album covers, scarves and stoles - all of these items can be decorated with exquisite motives. The art of ribbon embroidery is taught in special courses, but you can master it yourself.

It is necessary
- - silk ribbons from 3 to 12 mm wide;
- - base fabric;
- - needles with a wide eye;
- - sharp scissors;
- - threads for embroidery;
- - a simple pencil or felt-tip pen for fabric;
- - a hoop or stretcher.
Instructions
Step 1
You can embroider on silk, linen or canvas. For beginners, it is better to choose a looser mesh fabric - it will be easier to stretch the tape through it. Do not use stretch and knitwear - they will deform during the embroidery process. The choice of ribbons depends on the desired pattern - the wider the ribbon, the larger the flower will be. Wash and iron them before embroidery - the silk will become more shiny, and you will also make sure that it does not fade.
Step 2
Find a sample before getting started. This can be a photograph, a postcard of flowers, or a sketch made with your own hand. Professionals embroider multicolor compositions with the finest gradations of shades and even use the technique of self-dyeing ribbons. For beginners, it's best to tackle single-color embroidery to focus on getting the right stitches right.
Step 3
To embroider small designs, hoop the fabric. It is more convenient to embroider large pieces of fabric on a stretcher. Stretch the base well so that there are no folds or distortions on it. Use a simple pencil or special disappearing felt-tip pen for the fabric to mark a pattern on it.
Take a needle with a wide eye and a fine point. Blunt needles are ideal for embroidery on canvas or canvas, but not for satin and other heavyweight fabrics. Thread the ribbon into the eyelet and start embroidering.
Step 4
The ribbon embroidery technique is based on several types of stitches. Start by mastering a simple stitch. Stick the needle and tape from the wrong side of the fabric without pulling it out and mark the next puncture site. Pull the tape through the two holes at once, taking care not to twist it. The buttonhole stitch is sewn in a similar way. With the needle extended, leave some of the tape in a loose loop. Place such loops in a circle - you get a flower. Its middle can be embroidered with beads.
Step 5
One of the most popular motives is the rose. To complete it, embroider a star-shaped base of five rays (five large stitches converging in the middle) onto the fabric. Inject a needle with tape under the first ray of the star, skip the second and re-inject over the third. Starting embroidery from the center, move to the ends of the beams, alternating them and gradually filling the entire base. Do not stretch the tape so that the rose is voluminous. When finished, pull the tape to the wrong side and secure.


