Adding even a very simple border around text in the pages of a document dramatically changes the way it is perceived. And in the text editor Microsoft Word there are tools that allow you to choose frames that are suitable for the design of different types of documents. You can apply them both to all pages at once, and to highlight any of the most important of them, or to individual fragments of text within pages.

It is necessary
Microsoft Word 2007 text editor
Instructions
Step 1
Open the document on the pages of which you want to place the frame in a text editor and click the "Page Layout" section in the menu.
Step 2
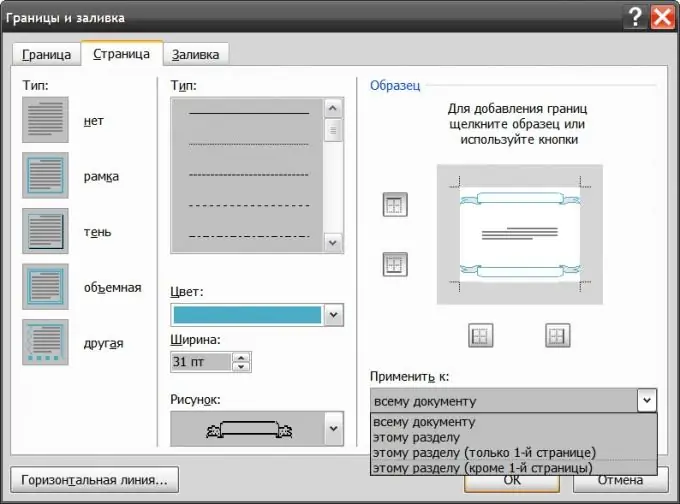
Click the Page Borders button found in the Page Background command group. This will open a window titled "Borders and Fill" on its Page tab.

Step 3
Select in the left column ("Type") the frame design option - regular, with a shadow, volumetric, etc.
Step 4
Set the required parameters of the selected frame design option in the middle column of this tab. Here you need to select the line type, its color and width in the drop-down lists. In addition, in the lower drop-down list ("Picture"), you can select from a long list any option for graphical replacement of a regular line.
Step 5
Click, if necessary, one of the icons indicating the edges of the document sheet. In this way, you can instruct the editor not to draw a frame from any edge of the page.
Step 6
In the Apply To box, select the scope of the frame drawing options you specified.
Step 7
Click the "OK" button when all the required frame parameters are specified. The editor will display it around the text of the document. Subsequently, you can change the specified parameters using the same dialog.
Step 8
There is another way to create frames, which can be used both for a single page taken as a whole, and for any arbitrary area within it. To use it, go to the Insert tab and click the Shapes button in the Illustrations group.

Step 9
Select the most suitable option for use as a frame from the drop-down list. Then move the mouse cursor to the upper left corner of the area that you want to place in the frame, press the left button and, without releasing it, move the cursor to the lower right corner of the area. If you want to maintain the proportions of the selected shape, then do it while holding down the SHIFT key.
Step 10
Right-click the frame you created and select Format AutoShape from the menu. This opens a window for detailed frame settings.
Step 11
Go to the Position tab and click the icon with the caption behind the text. This will move the frame to the back and make the text visible on this page.

Step 12
Click on the "Colors and Lines" tab and select the colors for the border that are most appropriate for the design of this page of the document. By clicking the "Fill Methods" button, you can get access to more advanced options for decorating the background of the page within the frame.
Step 13
Click the "OK" button and the task of creating a curly frame will be solved.


