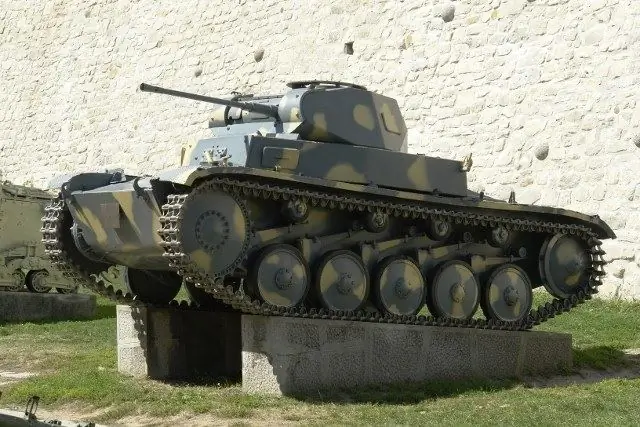
Real tanks can be seen not only at the military parade. In many museums of military equipment, such exhibits are in the open air and are available almost every day. They can be interesting drawing objects. In the museum itself, you will hardly have time to sketch, but you can take a photo and draw a tank from it at home.

It is necessary
- - paper;
- - pencil;
- - eraser;
- - paints;
- - brush.
Instructions
Step 1
Place the sheet horizontally. Using pencil marks, mark the space that will be occupied by the main object in the drawing - the tank. On the right and left, step back from the edges of the sheet by about 1 cm (for A4 paper). Above and below, you need to postpone the distance twice as much.
Step 2
Divide the remaining space in the center in half with the horizontal axis. Then lift the left end one centimeter up, and leave the right end in place. Draw a new slanted line that connects these points. This is the upper limit of the tank tracks. At the level of the bottom mark that you set in step 1, draw a line segment parallel to this line.
Step 3
Draw vertical lines to the right and left of the edges of the segments, the resulting rectangle will conventionally denote caterpillars. Also draw the tracks on the right side of the tank. Now you need to "cut" the bottom corners of the rectangles and round them, making the shape of the part more precise.
Step 4
Draw circles inside the tracks - 4 small ones at the top, 5 medium ones at the bottom, and 2 large ones on the sides. In this case, it is desirable not to use a compass. To make the freehand circle straight, first draw a square. Then draw rays of the same length from the center, equal to the radius of the circle. Then draw in detail the cylindrical parts that make up the track chain.
Step 5
Start drawing a two-piece tank turret and a muzzle. First, determine the size of all the elements, and only then draw in detail the shape and small details - loopholes and a hatch.
Step 6
Draw in straight lines the stone plinth on which the tank stands. Erase the extra strokes from the sketch and color in the drawing.
Step 7
First apply spots of light yellow paint mixed with a little green and brown. Then fill in the rest of the area with a khaki shade, which can be obtained by mixing green, gray and blue.
Step 8
Pay attention to how the light hits the object. The light source is on the left, which means the opposite side of the tank will be in shadow. All shades here should be slightly darker and colder.


