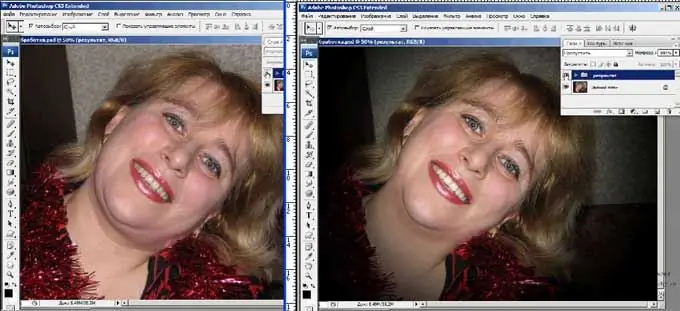
A double chin is an ugly and unpleasant defect in appearance, which cannot always be corrected quickly in life. However, modern technologies have the ability to change the appearance of people, if not in reality, then at least in photographs - and now you will see that removing a double chin in photographs using Photoshop is very easy.

It is necessary
Adobe Photoshop program
Instructions
Step 1
Open a photo that shows a rather large face with a double chin. Take the "Lasso Tool" in the toolbox and draw the outline of the neck where the second chin is not. Finish the stroke line under the second chin.
Step 2
Then right-click on the highlighted area and check the "Layer via copy" item. Place the cut out part of the neck on a new layer, click in "Edit" item "Free Transform". Using the transform tool, drag the second chin to the first so that they merge. While holding down "Shift" and "Ctrl", adjust the proportions to make the face look realistic.
Step 3
Once the silhouette of the face is ready, select the "Clone Stamp" in the toolbar to eliminate the imperfections, and then select the Eraser Tool and gently erase any excess around the face that remains from the selection and copying. Look - the second chin has disappeared.
Step 4
You can also use the Clone Stamp tool from the beginning. Zoom in on the photo and clone the clean areas over the crease between the first and second chin. However, the disappearance of the crease is not enough - the face will look disproportionate if you leave it that way.
Step 5
To make the massive lower part of the face smaller, open Filter and select the Liquify filter. In the left pane in the window that opens, check the "forward warp tool" and carefully reduce and pull up the lower border of the chin and jaw until the face becomes proportional.
Step 6
Check if the photo requires additional color and shadow correction. If you want to darken or lighten some areas, select the Burn or Dodge tools.


