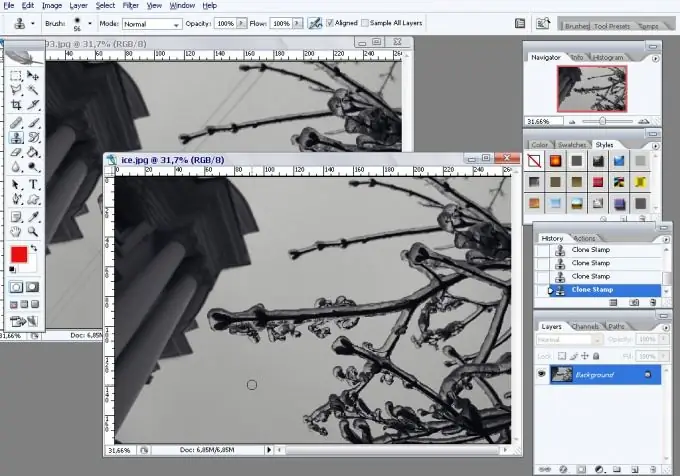
It so happens that extra objects appear in our photographs. Of course, you can take a new photo. But what if the photo was taken in winter and it's summer now? With the help of Photoshop, you can remove unnecessary objects from a photo and not wait for a suitable opportunity to take a new photo.

It is necessary
- 1. Photoshop program of any version
- 2. The image from which you want to remove unnecessary items
Instructions
Step 1
Open the image in Photoshop. Select the File menu, the Open item or use the hot keys Ctrl + O. In the photo, which is used for illustration, wires are caught in the frame. We will remove these unnecessary objects that spoil the picture from the photograph.
Step 2
Select the Clone Stamp Tool from the Tools panel. The Tools panel is by default on the left side of the program window. You can simply use the S hotkey.
Step 3
Adjust the parameters of the Clone Stamp Tool. To do this, left-click on the triangle next to the Brush palette (Brush), which by default is located in the upper left part of the Photoshop window, under the main menu.
The Clone Stamp Tool, like any brush in Photoshop, has two parameters: Master Diameter and Hardness, which are adjustable with sliders. You can also enter numeric values for parameters in the boxes above the sliders in order to customize these parameters. The first parameter determines the size of the brush with which we will remove unnecessary objects from the photo. The second parameter determines how hard the edges of the brush are.
In order to remove unnecessary objects from our photo, first select a semi-soft large brush.
Step 4
Enlarge the image for ease of use. You can do this by dragging the slider in the Navigator palette to the left, or by typing a numeric value in the field to the left of the palette slider. The Navigator palette is located in the upper right corner of the Photoshop window by default.
Step 5
Determine the area of the photo that we will clone to remove unnecessary items. To do this, move the cursor over the area of the photo, free of wires, and while holding down the alt="Image" button, click the left mouse button. The cursor changes to a circle with a crosshair inside.
Step 6
After releasing the Alt key, move the cursor over the item to be removed. Left-click. Some of the wires have disappeared. We repeat this simple operation, choosing the source of cloning the image as close as possible to the extra object that we are removing.
To navigate the enlarged photo, you can move the red rectangle in the Navigator palette. It limits the part of the photo that we see in the open image file window.
A few minutes of work, and all unnecessary items from our photo are gone.


