Adding captions to photos helps to give an artistic image a finished look and find new and unusual ways to showcase finished works. The task of placing text on a photo will not seem difficult if you have a tool like Adobe Photoshop at hand. And the developers of this program have made sure that you have at your disposal a variety of tools for text formatting.

It is necessary
Adobe Photoshop program. System requirements and complete software installation instructions can be found at
Instructions
Step 1
Open the photo in Photoshop. Open the "File" menu, select "Open" ("File" -> "Open") and open the file with the photo.
Step 2
On the toolbar, click on the small double "Default Foreground and Background Colors" box at the bottom of the toolbar to set the foreground color to black. This is the color with which you need to enter the text in this step.
Step 3
Select the "Horizontal Type" tool from the toolbar. The tool parameters panel will appear in the upper part of the program window. Set the required values. Select a font from the "Font" drop-down list. In the example shown, the font "Arial" was used. Choose a font style. In the example shown, "Regular" was used. Enter the font size in points in the "Size" text box. In the above example, a size of 30 points was used. Select "Crisp" from the "Anti-Aliasing" drop-down list. Select the "Center Text" text alignment option.
Step 4
Enter the caption you want to place on the photo.
The text automatically appears on a new layer in the upper left area of the image where you clicked.
Step 5
Click somewhere in the upper left area of the image window.
Notice that the "Layers" palette now contains a layer named "Layer 1" with a "T" next to the layer name to indicate that it is a text layer.
Step 6
Select the Move tool and drag the text where it is easy to read.
Notice that in the "Layers" palette, the layer name has been replaced with the text you entered.
In the above example, the text was moved slightly to the right, where the background in the photo is lighter.
Step 7
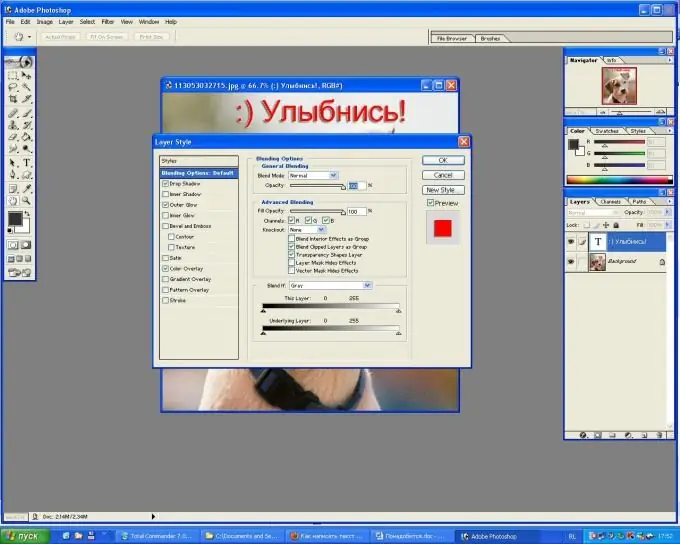
You can enhance the look of your decal by adding special effects from a collection of ready-to-use and editable layer styles. Open the "Layer" menu. Select "Layer Style".
After making sure the text layer remains active, experiment with your layer by setting different effects. In the example shown, the effects are set to "Drop Shadov", "Outer Glow" and the color of the text has been changed using the "Color Overlay" effect.
You can choose the values for each effect yourself by highlighting it and clicking on the name of the effect with the mouse.

Step 8
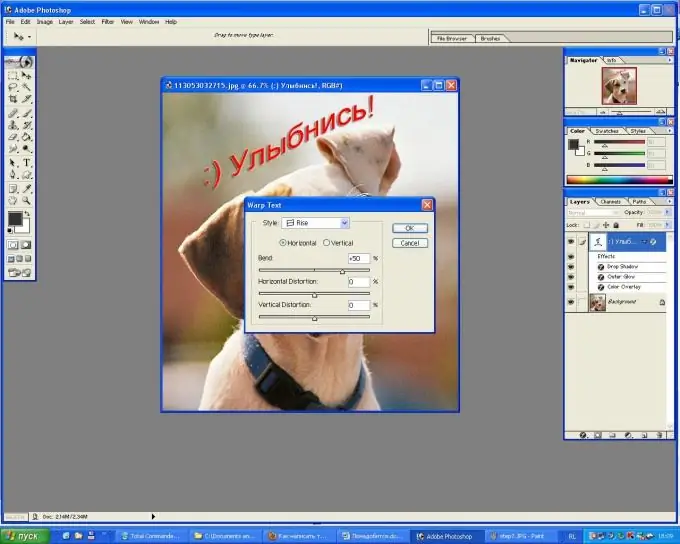
Photoshop provides the ability to give the inscriptions an original look by styling and deforming the text.
Make sure the text layer is still active. Select the "Horizontal Type" tool from the toolbar. The tool parameters panel will appear in the upper part of the program window. Click on the "Create Warped Text" button. Select the style you want in the "Warp Text" window and change the values.
In the example shown, the "Rize" style was used.

Step 9
On the tool options bar, click the "Commit Any Current Edits" button to accept your edits and turn off edit mode.
Open the "File" menu, select "Save" ("File" -> "Save").


