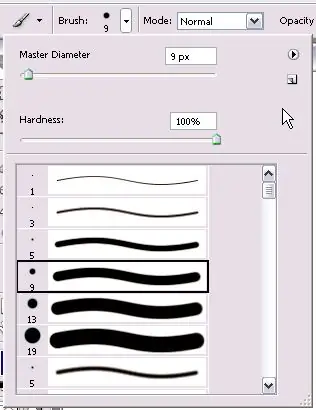
The brush is the most versatile and versatile tool in Adobe Photoshop. He alone can replace not only a great variety of real instruments, but can also create ready-made pictures. To master basic brushing skills, follow the steps below.

Instructions
Step 1
On the left side of the Brush Settings panel, find the Brush Set Menu. In this menu, select the diameter (size) of the brush you need and its hardness. Brushes are hard (with clear boundaries of the trace) and soft (in which the boundaries seem to be blurred). You can change these parameters by moving the levers, or you can set their numerical value yourself.
Step 2
To the right of the brush size, find a small black triangle. He brings up the menu. From this menu, you can choose how the brushes are displayed in the box. They can be displayed as small icons, large icons, and brush names. Here you can load, select, delete, rename brush sets.
Step 3
Learn how to load brushes into Photoshop. There are two ways to do this.
First: download the brushes you like, unpack the brush files (extension.abr) into the folder where all Photoshop brushes are stored (the Brushes folder). The next time you start the program, the brushes will appear in the menu, you only need to select them.
Second: open the brushes menu in Photoshop and select Load brushes, then manually select the path to the desired brush file.
Step 4
Now, learn how to create your own brushes. To do this, create a new layer and draw on it the shape that will later be the brush. Better make it black on a white background. On the panel, find the menu Edit - Define Brush. In the window that opens, enter a name for the brush. This brush will now appear in the brush set.
Step 5
To the left of the menu, find another brush icon. Here you can select a set of tool parameters. The most commonly used brushes will be displayed in this menu.
Step 6
In the brush menu, find the handles that can adjust the hardness and opacity of the brush. Try changing these parameters and see what the result is. This way you will quickly understand how to work with these parameters.
Step 7
Now turn on the brush palette and start exploring it. In this menu, you can select a specific brush and change a huge variety of its parameters. You can choose the size, tilt to any side by any number of degrees, you can even flip it.
Step 8
You can set the interval between prints, you can make it so that several prints drawn in one stroke will have different transparency and different colors. Try changing a few parameters in this menu and see what you get.


