The Japanese call the art of writing hieroglyphs "a drawing of the heart." Indeed, in order to truly understand how to draw intricate symbols, you need to comprehend their meaning, understand the meaning of each line. In order to excel at calligraphy, you must be imbued with the beauty of writing.

It is necessary
- - hieroglyph sample;
- - paper;
- - brush;
- - ink.
Instructions
Step 1
Each era was characterized by its own technique of writing hieroglyphs. For the beginning of the development of calligraphy, strokes similar to the footprints of birds are characteristic. In the early Middle Ages, “herbaceous hieroglyphs” appeared, a distinctive feature of which was a bizarre ligature. Later, hieroglyphs with pointed ends of lines came into vogue. Choose which period your hieroglyph belongs to or in which technique you would like to write it.
Step 2
Prepare paper and mentally draw a square on it. To make it easier to draw, you can draw subtle lines with a regular pencil.
Step 3
For the correct spelling of Japanese characters, you should know in what order the lines are drawn. It is necessary to write the hieroglyph from left to right, from top to bottom.
Step 4
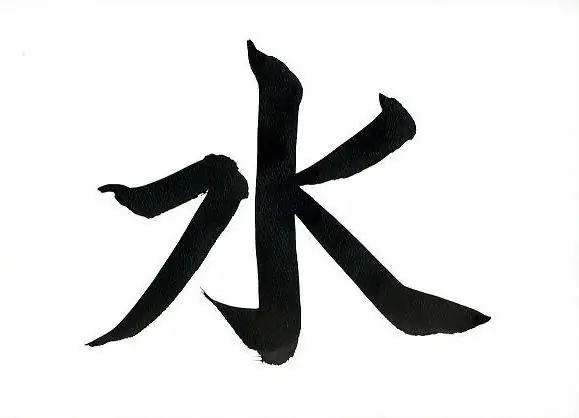
Try drawing the Japanese character for "water" - "mizu", which has four parts. Find a picture with this symbol, carefully examine it, enjoy the beauty of each of its lines. Think about the fact that the word "mizu" is bubbling and sonorous, like water in a spring flowing over stones. Before you start writing, you must feel the hieroglyph and love it.

Step 5
First, draw a vertical line. Draw it from top to bottom. It originates at the upper edge of the imaginary square and stretches to the lower edge, at the end bending into a kind of comma, similar to the head of an ostrich.
Step 6
Draw the hieroglyph element on the left. First, a short and thin horizontal line, then, without lifting your brush from the paper, hold your hand a little near the vertical line and write a diagonal line slightly thicker than the first.
Step 7
The hieroglyph element on the right consists of two parts. Draw an oblique line from top to bottom, without bringing it to the main line, and then mentally divide the main vertical line into four parts and from the beginning of the second quarter draw the last line of the hieroglyph to the side so that it touches the third. The line should not be brought a little to the bottom of the square.
Step 8
Look at your hieroglyph. Are you satisfied with the resulting symbol, do you like it? Do you think about a transparent mountain river or lake surface when you look at a drawing? If you feel positive emotions while looking at the hieroglyph (while it, of course, looks like the original), then you have begun to successfully comprehend the art of calligraphy.


