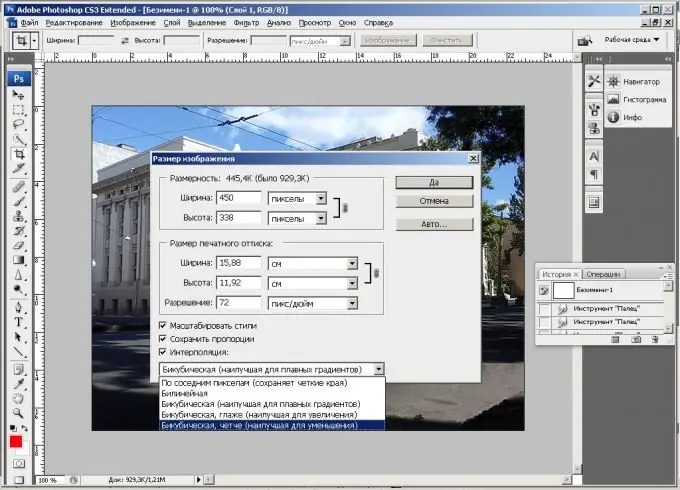
Among the basic photo manipulations in graphic editors, one of the most useful actions is to zoom in and out of photos. The ability to reduce or enlarge an image will help you in a variety of situations - to optimize photos and prepare them for posting on the Internet, to form photo collages, for photomontages and much more. The process of resizing a photo is very simple.

Instructions
Step 1
First, open the photo in Adobe Photoshop by choosing Open from the File menu. Then open the Image menu and select the Image Size section. A window will open in which you need to specify the new dimensions of the photo in pixels.
Step 2
Set the desired width and height of the image. In the Pixel Dimensions item, you set the direct resolution of the photo, and in the Document Size item, you can determine the size of the printed sheet with this image in centimeters.
Step 3
Enter your values in the Height and Width fields. They will be automatically adjusted by the program to the proportions of the photo so that it does not deform or stretch if you have checked the Constrain Proportions item. Click OK - your photo is reduced.
Step 4
You can also change the extension of a photo by automatically optimizing it for web pages without losing quality. To do this, open the File menu and select the Save for Web & Devices item. Set JPEG High as the preset. The same can be done by selecting the JPEG format with High Quality 8 from the File -> Save As menu.
Step 5
If you do not want to lose the quality of the bitmap, never enlarge the photo from a lower resolution, otherwise, the quality will be seriously affected.
Step 6
You can get a photo of the appropriate quality only if you reduce the resolution, changing a larger photo to a smaller one. If you have a small photo, you will not be able to increase its resolution without pixelation.


