Creating a drawing in Microsoft Paint is possible thanks to an extensive set of tools: pencil, brushes, insertion of inscriptions and geometric shapes, as well as an extensive color palette, in which you can either choose a standard shade or define it yourself.

Instructions
Step 1
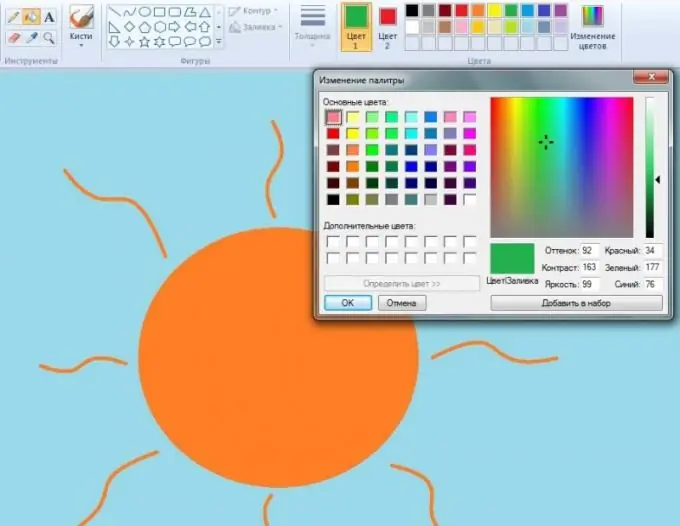
In addition to the primary colors of the spectrum, the palette in Microsoft Paint contains some of their shades: orange, pink, gray. However, only a few colors are placed on the top panel, and they are clearly not enough to create a full-fledged image. In order to get a new color, it is necessary to click on the button "Change colors" located to the right of the palette. After this action, a small window opens containing a more extensive list of tones, as well as a rainbow area, by moving the cursor over which you can find and select a new shade.
Step 2
The cursor, which is located on the rainbow area, looks like a crosshair and is moved by hovering over it with the mouse arrow and holding down its left key. The color change can be observed in the square below. The line to the right represents the brightness, which can be changed by dragging the black triangle along it. Up - lighter, down - darker. The same parameter can be set by filling in the “Brightness” block with a number from 0 to 240. The higher the number, the lighter the color becomes.
Step 3
When you move the aiming cursor over the rainbow area, the values of the "Tint", "Contrast" blocks, as well as "Red", "Green", and "Blue" are changed. The “Contrast” parameter, if it is represented by a small number, brings any color closer to gray, and the value in the “Hue” block changes the color dramatically, moving the “crosshair” along the spectrum. Thus, by changing the numbers only in these three blocks, you can choose one of many thousands of shades.
Step 4
Having found the desired color and visualizing it in the corresponding square, you must sequentially press the "Add to set" buttons, after which it will appear in one of the "Additional colors" and "OK" boxes. The tint will also appear in the bottom row of the color picker.
Step 5
If a part of the image already has the required color and needs to be transferred to another area, but at the same time it is difficult to identify and find in the color palette, then it can be copied using the tool, which is represented on the toolbar as a button with an eyedropper. Before copying, select the tool that will draw the specified area of the picture. For example, a brush. After that, you need to click on the eyedropper and, hovering the mouse cursor over the desired color, left-click, after which you can start drawing.


