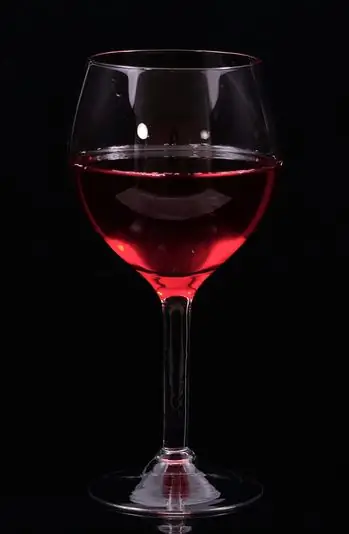
Glasses, wine glasses and wine glasses appear on still lifes with enviable regularity, and therefore are perceived quite routinely: the shape of the object is simple, and it itself often plays the role of "extras". However, working on such an object requires skill - glass is considered one of the most capricious materials for an image. It will be useful for novice artists to practice drawing a glass, making it the only hero of the picture.

It is necessary
- - pastel paper;
- - a simple pencil;
- - eraser;
- - acrylic paints;
- - brushes;
- - a glass for water;
- - palette.
Instructions
Step 1
Take a sheet of black pastel paper. The A5 format will be enough. Use a simple T or 2T pencil to sketch.
Step 2
Place the paper vertically. Draw a vertical line from the top to the bottom of the page. The beam dividing the plane in half is the central axis for constructing the object.
Step 3
Make perpendicular notches on the axis, which will represent the three main parts of the glass: the cone-shaped support, the leg, and the container itself.
Step 4
Using the sighting method, clarify all the proportions. Take as a unit of measurement the height of the lower tapered part of the leg. Count how many times this distance fits in each part of the glass: from the top edge of the glass to the liquid level, almost two units (one and three quarters) will fit, further to the junction with the leg - two and one third, in the leg - two and two thirds. Make all serifs longer: they will become auxiliary horizontal axes.
Step 5
On each of the horizontal lines, draw ellipses that make up the shape of the glass. Make sure that the right and left parts of each of the ellipses are equal about the vertical axis and rounded smoothly, without "flattening".
Step 6
Connect the sides of the ellipses with smooth lines, repeating the outline of the glass. Erase all construction lines, leaving only the outline of the subject.
Step 7
For a realistic image of glare glass, acrylic paints are suitable: they are opaque enough to convey the saturation of the wine in the glass, and when dissolved with water, they will become translucent like glass.
Step 8
Start filling in the lightest areas, gradually building up the color saturation. Mix blue, red and white paint until a light lilac color is obtained, dilute it with water and apply to the sides of the cone on which the stem of the glass rests. In the areas to the right and left of the red highlight, blur the lilac so that the black color of the paper shines through.
Step 9
In tiled red, sketch out the junctions of the main part of the glass with the stem and draw a thin line on the surface of the wine. Diluting the same color a lot, make two large strokes on the right and left sides of the glass closer to its top edge.
Step 10
In maroon, paint the bulk of the wine in the glass, allowing the background color to shine through the paint. Use thick whitewash to apply three highlights on the glass and a transparent sheen in a semicircle in the center of the picture.
Step 11
Dip a thin synthetic brush into the whitewash and run it along the edges of the glass where they shine from the incident light.


