If you want to make a beautiful and easy-to-perform mask for a festive masquerade or school (university) performance, try making a paper mask using the papier-mâché technique. Moreover, this mask will fit perfectly on your face. Now we will tell you how to make a paper mask.

Instructions
Step 1
Cut the newspaper into small pieces of two types: some clean newspapers from the margins, and others with letters, so as not to get confused later. Prepare a glue (not odorous or brittle after hardening). Then, if necessary, collect your hair so that it does not climb on your face, smear your face with Vaseline and sit in front of a mirror. If you are afraid to put paper on your face, then you can buy a blank for the mask. They can be found in art stores. The mask will also need to be greased with oil or petroleum jelly before starting work.
Step 2
Wet the first layer of letter scraps (no glue, of course) and stick on your face. Then sculpt a layer of clean scraps with glue. Next comes a layer with letters on the glue, then - clean and so on to the required thickness. The first layer should be larger than the rest so that the glue from the remaining layers of newspaper scraps does not get on your face. Don't worry about the shape of the mask. After all, you will then cut off all unnecessary things.
Step 3
If you are making a mask using a blank, then the first step is to mark up the future mask. You can cover the entire face, or you can make a mask that covers only half of the face. It's only up to your imagination. Mark out the outline of the mask, if necessary, and start pasting with paper in the same way as if you were making the mask by gluing it to your face. Do not forget that there is no need to glue the eyes and mouth. You can carefully paper over the areas around the slots.
Step 4
Let the mask dry, remove it from the face or workpiece and leave to dry overnight. Check the mask the next morning to see if it has hardened. If so, place it on your face and mark with a pencil or pen the cutouts for the eyes and, if necessary, for the mouth. Now cut off all unnecessary from the mask with scissors, cut out the cutouts for the eyes and mouth with a sharp clerical knife. After that, do not forget to paste over the mask around the edges with pieces of paper so that the edges do not fray over time and so as not to prick the skin. If you made a mask by gluing paper to a workpiece, then, as a rule, the eyes were not glued in the process of work and this step can be skipped.
Step 5
Cut a piece out of a beautiful dense fabric (for example, velvet) about the size of your mask with a slight allowance around the entire perimeter. Begin to gradually glue the velvet to the "face" of the mask. Once you're done with this, glue the protruding areas of the fabric to the inside of the mask and carefully cut out the eye sockets and mouth on the fabric.
Step 6
Apply glue to the inside of the mask, almost reaching the edges. Now cover the mask with a cloth and from the inside. Then decorate the "face" of your mask with rhinestones, shreds of silver fabric, laces and more. If glue appears on the velvet, wipe it off with a damp cloth. Buy or search at home any elastic (preferably a transparent elastic for dresses or bras) and attach it to the sides of the mask. That's all.
Step 7
If you do not want to use the papier-mâché technique in your work, then you can try to make a regular mask out of paper. You can easily make a bird mask with just glue, colored paper, scissors, and an elastic band. It's good if you still have a small piece of thin cardboard on hand, but you can do without it. What kind of bird will be depends only on your imagination and the available flowers. If you have brown paper, then you can create an owl mask, if there is a lot of paper and it consists of various colors, then you can make a hummingbird mask, if orange and yellow paper colors prevail, then you can make a firebird mask. Well, if you only have black paper at hand, then you can create a crow mask.
Step 8
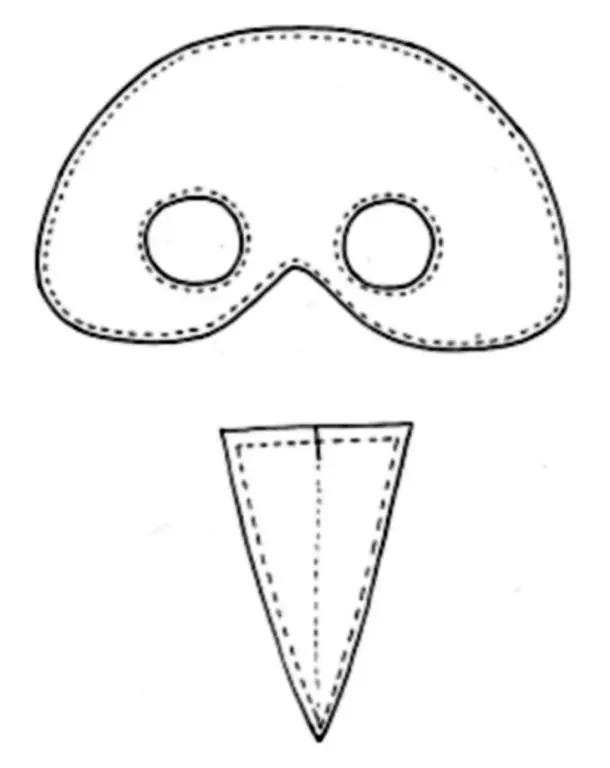
Take a piece of cardboard so that the wider side is horizontal. Fold the cardboard in half, making the fold vertically exactly in the middle. This part will be the base for the mask. You need to draw the shape of the future bird mask. As a rule, it will cover only part of the face. Most often, the shape is made oval. Do not forget to cut out the place where the bird's beak will be attached later. We will do it separately. You can make a base with straight and smooth edges, or, by showing imagination, make a fantasy pattern on the future mask. If you don't know what shape to cut, you can use a mask template.

Step 9
Be careful not to space the eye holes too wide. It is better to first cut out the outline of the future mask, then attach it to the face exactly in the middle and only after you outline the level of the eyes, cut out oval or round holes.
Step 10
Now take some colored paper and start cutting out the feathers for the future bird mask. To significantly reduce the time, you can fold the paper as many times as possible and only then cut it. So you can make a large number of feathers with just one movement with scissors. You can choose any shape, but most often feathers are cut in the form of leaves. Cut from the fold so that the scissors cut the sheet in an arc. Then unfold the feathers from the mask paper.
Step 11
When you have cut out all the feathers, go into the mask holder. To do this, you need a regular rubber band. You can buy it at any sewing store. You can use tape if you want. Then you will need to take two ribbons, each about half a meter long. You can attach one elastic band. When you put on the mask, the elastic will simply stretch. Therefore, the length will need to be chosen based on the volume of the head. Remember that the elastic on the mask you are wearing should have a slight tension. Try to keep it below 50% of the maximum possible. Attach the tape to the base of the mask with a regular stapler. Place a few staples on each side.
Step 12
Now take care of the beak. Depending on the type of bird you want to mask, choose the color of the cardboard that will become the beak. In most birds, it is either black or brown. Fold the cardboard in the middle into two equal pieces. Take the necessary measurements before cutting the cardboard. The length of the beak can be of any size depending on your desire. But the part that will be attached to the mask should be equal to the length of the bridge of the nose on the mask. Remember to leave a little space at the base of the beak so you can glue it down later. Make several small vertical cuts on the base so that it will be easier to glue it later.
Step 13
Glue the beak to the base of the mask by applying glue to the places where you made the cuts. After the glue is dry, start styling your bird. You only need to glue feathers at their base. More than half of the paper pen should be loose. Begin to paste over the mask from the edges, gradually approaching the center. To make the cutouts for the eyes more spectacular, the decor can be supplemented with rhinestones or feathers of a different color. Do not forget that when performing a bird mask from the same color, the fold may differ. Better to paint over it with a felt-tip pen or pencil.


